 Over the last year or so I have found that more and more new clients are aware they need to create a content strategy for their websites and know they need to tie this in with their social strategy; but surprisingly some are still unaware of Google+’s authorship markup and the importance it plays in a successful strategy.
Tom wrote a great article about Authorship and why it’s important for SEO, so I’m not going to explain this here. Instead, I have compiled a quick guide on how to set up Google authorship and I also want to make you aware of a few recent updates Google have introduced to the process.
What are we trying to achieve?
The principal idea is to link your Google+ profile and your content together. This is so that Google understands you as an author, understands your content on the web, and can as a result use the association to add authorship information to search results:
Setting up Google+
Before we start, you are going to need a personal Google account with your Google+ profile set up. If you don’t have one already, then remember, when setting the account up, that Google will use your G+ profile name to help link to your byline or bio name, so make sure the account is specific to you and not a shared account.
Option 1 : Setup Authorship using a verified email address.
Once you have an account, the quickest way to get your authorship set up in G+ is to complete the G+ profile link page. This allows you to verify a valid email address with the domain you are trying to associate your Google+ account with.
For example, if you want to set up authorship for www.domain.com and have a domain email address ([email protected]) then submit that to Google, verify and Google will automatically set up a contributor link to your profile and associate your content with your profile. Simple!
Option 2 : Setup Authorship by linking to your Google+ Profile
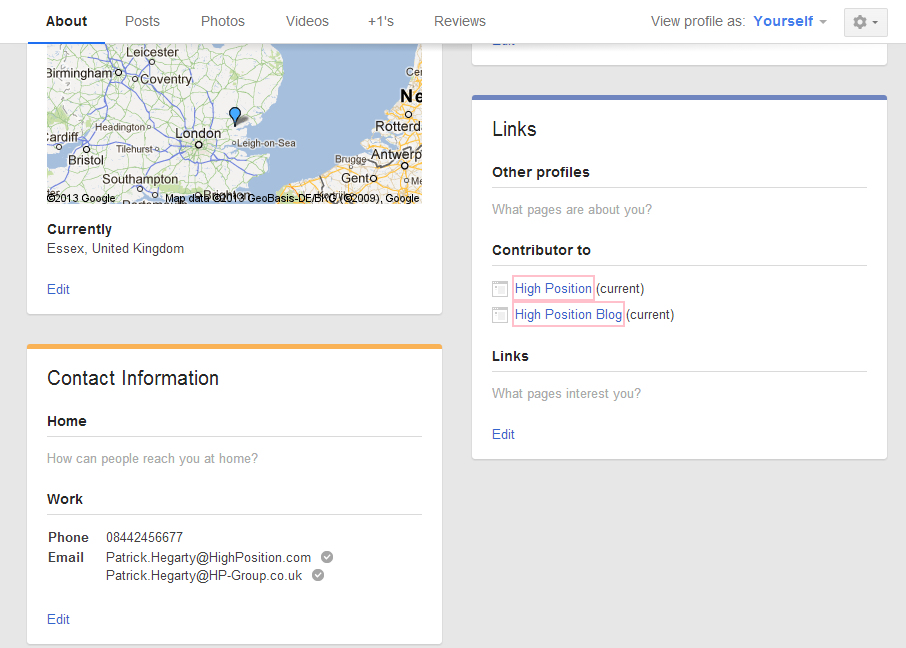
If you don’t have an email address on the same domain as the website, don’t worry, you can set up authorship by adding your website to the ‘Contributor To’ section in G+ and then adding a ?rel=”author” link on your website. This was one of the original ways authorship could be verified, which is why we have it set up on our blog.
You can find the ‘Contributor To’ in Google+ here:
About > Links > Contributor To
Below is an example of the the rel author link in my Author Bio. Note the link should be structured as follows:
https://plus.google.com/myuserid?rel=author
By setting up links on both the website and your contributor list you verify that you are who you say you are and that you have access to the site.
If all goes to plan, within a few days you should hopefully start to see your picture in the search results 
Issues And Options
The current documentation from Google states that if you have a email address on the same domain as your website then you don’t need the link back from the site, as long as each article has a byline with the same name as your G+ profile. We’re still waiting to see how well this is working, so would recommend adding the G+ link from your website as well.
We would also strongly suggest testing and verifying how Google views your authorship by using the Structured Data testing Tool from Google’s Webmaster Tools and if you can’t see your authorship details in the search engines results, we’ve found that being logged in can cause this issue.
IMPORTANT TIP - The final tip we would suggest for ensuring your picture shows in the search results is making sure your Google+ profile information is well filled out and most importantly, that your profile picture is a good clear head shot. If it isn’t recognisable then there’s a good chance that Google will refuse to show your picture in SERPs.
Have any questions or gripes with getting Authorship set up? Have a tip on getting your picture listed in SERPs? Please leave a comment below to tell us your story and experiences with Google Authorship.


I’ve just finished setting up another client with Google+ authorship using option one and the testing tool shows that verification via email is working, so it looks like this option is working but I’m still waiting to see if the authorship details appear in SERPs. Will update when I know more.
“we’re still waiting to see how well this is working” - 2 or 3 weeks later and it’s still not working for me.
I feel like I’m banging my head up against a brick wall.
Even the structured data testing tool says it is set up right. I am worried perhaps the issue is that we need to have a bio for each author somewhere on the site but I can’t find anything that says that is the case.
Do you have any advice on the time you should expect to wait?
Hi Melaine,
I understand your frustration and would recommend adding an authors page with each authors bio on it. Maybe expand the bio on the authors page.

As to showing up in SERPs, I found that having the authorship set up does not automatically mean you will see your pretty face beside your article.
i believe that it’s a mix of Google still working on the Authorship and a highly active Google+ account. Unfortunately due to the fickle natural of Google we won’t know for sure.
To be safe I would recommend doing both options for verification and trust that even if your photo isn’t appearing, your Authorship is working
Thanks for the advice Patrick, I’ll get the author’s bios up on the site and see if that can help. I’ll let you know too as it could be another helpful hint!
Brilliant timing, it started working on the 7th, in the afternoon.
Nothing to do with biographies, I just needed to be more patient it seems!
Wonderful
I’m glad it’s all working for you.
Hi Patrick
I have verified my own profile (Rowan Carver) with the Google + Nisos Yacht Charter page, so I think that is set up.
On my blog entries (http://www.nisosyachtcharter.com/the-news.html) is it just a case of saying, “submitted by Rowan carver” at the end of the blog then, Like I have done on the more recent entries, and Google magic will do the rest?
Thanks for the good guide.
Hi Rowan,
Assuming you went for the email address verification method and that was successful then yes that should be all you need to do; I can see you have configured the ‘Contributor’ options. Otherwise you will need to add the authorship markup on-page as per option 2.
Let us know if you need any further assistance.
Chris